Basic Suspension Theory
Born from many years of racing car building, the Ginetta G33 has the suspension of a race car on the road. This includes twin wishbones all round with rose joints and fully adjustable camber, toe angles, spring height, and damper settings on both front and rear. The rose joints run without lubricant and would appear to be open to the abuse of road dirt, but after 20k miles of road use, show no significant wear on my car, but there again they have not been abused. As a matter of interest it's possible to fit silicon rubber seals to them, but at around £7 per joint it can work out more expensive than periodically replacing a worn joint. As with anything with so many adjustments there is a plenty of room to get things wrong, or a minor suspension knock may put the values outside their correct settings. After 10 years use it was also time to replace all the suspension bushes as my car was becoming unstable under braking, and generally feeling sloppy. I suspected the rear suspension alignment, and a quick check on a laser-tracking gauge showed positive camber on one rear wheel, negative on the other and 10mm toe in across the rear wheels that seemed somewhat excessive. The massive torque from the Rover V8 takes it's toll on the bushes quite quickly and this looked on first inspection to be the cause of very high tyre wear.
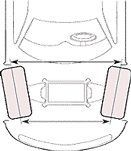
Setting up the suspension from scratch or adjusting it can seem a little daunting at first, but with care and time it can be set up with only the most basic tools. There are 5 basic settings that can be changed. Below is an explanation of what the settings do.
Toe angles: This is the horizontal angle between the front or rear wheels.
If the wheels are set parallel around the car, the forces exerted on the wheels as the car moves forward tend to push the front of the wheels outward. This will start to steer the car making it unstable in a straight line and to compensate for this a little “toe in” can designed into the suspension so the front of the wheels face inwards slightly. This will also compensate for the compliancy in the suspension bushes by applying a slight inward force and keeping tension in the bushes so the wheels do not wander ether side of straight ahead. If you add a bit more toe in this will also aid straight line stability as even if the front edge of the tyre moves outward, it will now still be pointing within the centre axis of the car so little steering will take place. The down side of this can be increased tyre wear, and can make the car slower to turn in, although this is hardly a problem on a short wheelbase G33. The same principles apply to the rear wheels even though they do not steer as such, but with too little toe in will allow the suspension compliancy to destabilise the car. Due to the massive loads placed on the rubber bushes in the rear suspension by the torque from the V8, the G33 was factory set with considerable rear toe in (up to 5mm per wheel) to keep the car stable.
Cars that run no toe in or positive toe normally have very hard suspension bushes and are normally set up purely for race use. The toe angle is set buy the screw thread at each end of the steering rack (front) or tie rod rose joint thread on the lower rear wishbone.
Camber angles: This is angle the wheels sits off the vertical axis.
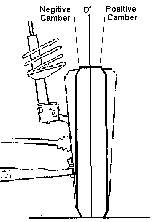
In an ideal world, the tyres tread will always be at flat to the road surface at what ever angle the body may roll during cornering for maximum grip. A twin unequal length wishbone set up like the G33 allows the top of the inner tyre to move outwards (positive camber) as the body starts to roll inwards and the suspension compresses on the inside wheel. This effect when combined with the roll of the body, (causing the suspension mounting points to move horizontally) keeps the tyre contact to the road at maximum. The outside wheel does the opposite as the suspension drops as the body rolls. helping to also keep tyre contact at maximum. This effect only occurs over a certain range of wishbone movement so the camber angles have to be set with the wishbones set at the correct ride height to start with. Although it may appear that some “race” cars run larger amounts of negative camber, this is simply to overcome poor suspension design or side flex in high profile tyres in an attempt to increase tyre contact during cornering.
Ride Height & Corner Weights
Although this simply a case of winding the spring platforms on the damper up or down, its needs to be set in relation to the correct wishbone angle so the suspension camber angles can be maintained correctly. It can also affect the point bump steer occurs (this is when the vertical movement of the suspension causes the front wheels to steer inwards or outwards). Corner weights also tie in directly with the ride height. Ideally all 4 tyres should have the same downward pressure exerted on them, so the grip is uniform and cars handing uniform and the G33 is almost 50:50 front / rear distribution so its possible to get the corner weights near uniform. If one wheel has a lower load, then raising the spring platform will increase the load on that wheel, and decrease the others. BUT…. the left/right weight distribution is not even on the G33, (left side is heavier), plus addition of a driver and passenger will change the loadings as well. If you raise the spring platforms to equalise the loads, the ride heights will raise accordingly. Realistically corner weights really only need be set for race track use, with the driver in situ. For road use simply setting the ride heights should be sufficient.
Bump Steer Point
Due to imperfect position of the steering rack, bump steer will occur at some point in the G33 suspension travel. This problem is due to pivot points on the tack rod ends not aligning with the suspension pivot points and the ride height needs to be set so, in normal use the bump steer point should not be reached. If you wish to alter the factory set ride height, there is adjustment however available on the track rod ends to move the bump steer point point outside of the suspension travel.
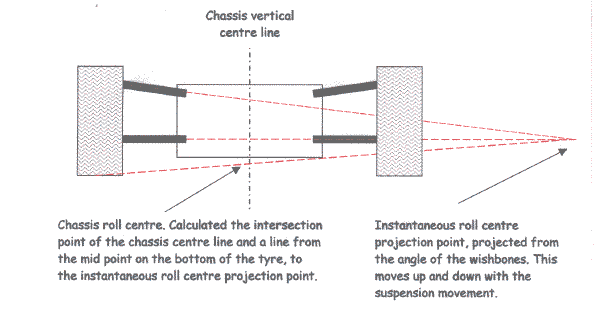
Roll Centers
Ok so this is not a simple screw adjustment, but worth mentioning as the standard G33 geometry give unstable handling on the limit. The roll centre is the line the car chassis pivots on horizontally as it corners, and is set up by an intersection angles of the upper and lower wishbones. This is not the same as the centre of gravity of the car as its an imposed point set by the suspension geometry. In the case of the G33 in intersection points of the rear wishbones and front wishbones are at different heights, so the roll centres are different. In practical terms if the roll centres where the same, the chassis would roll along a line parallel centre line to the road surface, but as they are different you it causes the chassis to twist at an angle to the road. One effect of this leads to instability if you throttle off at the point rear traction is being lost when cornering. Better known as lift off over steer and very undesirable.
The whole issues of setting suspension up is a matter of compromises between the various setting, and there is no one exact setting that’s perfect for all situations, so a race car will be set up differently to a road car. Small changes (as in mm or degrees) do make a considerable difference, and due to the very adjustable nature of the G33, one can experiment a bit.
Effect of Suspension Changes
I found this very interesting table that's well worth reading if you wish to change your spring rates or generally alter things. It is from the Book "Performance Handling" By Don Alexander. Some of the adjustments suggested are not available on the G33.
Before making changes to suspension components and settings, it is good to know how the changes will effect performance and ride. The following chart will help give you a general idea of the effect a specific change will make to handling and ride.
| Modification | Effect on Suspension |
|---|---|
| Increase front and rear rate | Ride harshness increases; tyres may not follow bumps causing reduced traction. Roll resistance increases. |
| Increase front rate only | Front ride rate increases. Front roll resistance increases, increasing understeer or reducing oversteer. |
| Increase rear rate only | Rear ride rate increases. Rear roll resistance increases, increasing oversteer or reducing understeer. |
| Decrease front and rear rate | Ride harshness decreases; tyres follow bumps more effectively, possibly improving traction. Roll resistance decreases. |
| Decrease front rate only | Front ride rate decreases. Front roll resistance decreases, decreasing understeer or increasing oversteer. |
| Decrease rear rate only | Rear ride rate decreases. Rear roll resistance decreases, decreasing oversteer or increasing understeer. |
| Modification | Effect on Suspension |
|---|---|
| Increase front rate | Front roll resistance increases, increasing understeer or decreasing oversteer. May also reduce camber change, allowing better tyre contact patch compliance with the road surface, reducing understeer. |
| Increase rear rate | Rear roll resistance increases, increasing oversteer or decreasing understeer. On independent rear suspensions, may also reduce camber change, allowing better contact patch compliance with road surface, reducing oversteer. |
| Decrease front rate | Front roll resistance decreases, decreasing understeer or increasing oversteer. More body roll could reduce tyre contact patch area, causing understeer. |
| Decrease rear rate | Rear roll resistance decreases, decreasing oversteer or increasing understeer. On independent rear suspensions, more body roll could reduce tyre contact patch area, causing oversteer. |
| Modification | Effect on Suspension |
|---|---|
| Increase rebound and bump rates | Ride harshness increases. |
| Increase rebound rates only | On bumps, tyres may leave track surface. |
| Increase bump rates only | Body roll resisted; outside tyre loaded too quickly; car won't stabilize into a turn. |
| Decrease rebound and bump rates | Ride harshness decreases; car may float over bumps. |
| Decrease rebound rates only | On bumps, tyres follow track surface more effectively; car may continue to oscillate after bumps. |
| Decrease bump rates only | Body rolls quickly; car is slower to respond to turn-in. |
The Importance of Tyre Temperatures
In the course of testing the handling of a car, use tyre temperatures and driver feel to make adjustments. It is critical to monitor tyre temperatures often. They offer valuable clues to the setup of the car. The areas of adjustment that tyre temperatures are used for include: tyre pressure, camber, body roll, shock settings, wheel width and transient handling response.
| Reading | Handling problem | Reason |
|---|---|---|
| All tyres too hot | Compound too soft for track and ambient temperature conditions | |
| Front tyres too hot | Understeer | Front tyre pressures too low |
| Rear tyres too hot | Oversteer | Rear tyre pressures too low. |
| Inside edges too hot | Too much body roll | Too much negative camber or too much toe-out |
| Outside edges too hot | Too much body roll | Too little negative camber, too little toe-out or too much toe-in or wheel width too narrow for tyre width |
| Center of tread too hot | Tyre pressure too high | |
| Edges on too hot | Tyre pressure too low | |
| All tyres too cold | Compound too hard for track and ambient temperature conditions or car not being driven to limit | |
| Front tyres too cold | Inadequate load on front tyres | |
| Rear tyres too cold | Inadequate load on rear tyres |
Solving Handling Problems
The key to setting up your suspension is in diagnosing what the handling problems are and resolving how to fix them. While car enthusiasts often baulk at the "black art" of suspension tuning, there's no reason to. As with working on the mechanical aspects of an engine, the trick to suspension tuning is in the troubleshooting; there is always a cause and an effect.
| Problem | Manifestation | Solutions |
|---|---|---|
| Steady state understeer | All turns or low-speed turns only | If front tyre temps are optimum and rears are low, stiffen rear antiroll bar; if front temps are too hot, soften front (most likely).
If front tyre pressures are optimum, decrease rear tyre pressure. Increase if chunking occurs. Improper front camber. Too much body roll at front, causing excessive camber change. |
| Steady state understeer | High-speed turns only | If front tyre temps are OK, increase front downforce.
If front tyre temps are too hot, reduce rear downforce. |
| Steady state oversteer | All turns or low-speed turns only | If rear tyre temps are optimum, with fronts too low, stiffen front antiroll bar; if rear temps are too hot, soften rear antiroll bar (most likely).
If rear tyre pressures are optimum, decrease front tyre pressure. Increase if chunking occurs. Improper rear camber. |
| Steady state oversteer | High-speed turns only | If rear tyre temps are OK, increase rear downforce.
If rear tyre temps are too hot, reduce front downforce. |
| Corner entry understeer | Front shocks are too soft in bump resistance.
Too much front toe-in; use a small amount of front toe-out. |
|
| Corner exit understeer | Rear shocks are too soft in bump.
Front shocks are too stiff in rebound. |
|
| Corner entry oversteer | Rear shocks are too soft in rebound.
Rear ride height is too high (too much rake) compared to front. |
|
| Corner exit oversteer | Rear shocks are too soft in rebound.
Too much rear toe-in or any rear toe-out. |
|
| Straightline instability | Tyre pressure is too low in one or more tyres.
Too little positive front caster. Too much front toe-in or any toe-out in rear. |
|
| Straightline speed too slow | Too much overall downforce.
Too much toe-in or toe-out. Ride height is too hight. |
|
| Excessive steering effort | All turns | Too much positive caster. Front tyre pressures are too low. |
| Chassis or suspension bottoms | Spring rates are too soft.
Shock absorber bump rates are too soft. Inadequate suspension travel Inadequate ride height. |