Sorting the G33 Cooling System
The basic system fitted by the factory is sufficient to cool the engine, but has the following weaknesses:
Air pockets in the inlet manifold and head lead to steam pockets that can cause the temperature to shoot up to around 100’C and then suddenly drop.
Solution: Remove the thermostat, take out the bobble valve and to allow free movement of coolant and steam pockets before the thermostat opens.
There is a mixture of metals used with aluminum engine mixed with steel tubes. This is bad news and can lead to electrolysis between the metals if the antifreeze is not providing sufficient corrosion protection. This leads to silting up of the radiator with various metal salts.
Solution: Remove all steel pipe work (Top hose to radiator and hose joints below the water pump) and replace with aluminum. FULLY FLUSH THE SYSTEM WITH RAD FLUSH. Tedious but effective. Refill with clean rainwater (to prevent lime scale building up) with lots of antifreeze (30% plus) or coolant improver / corrosion inhibitor.
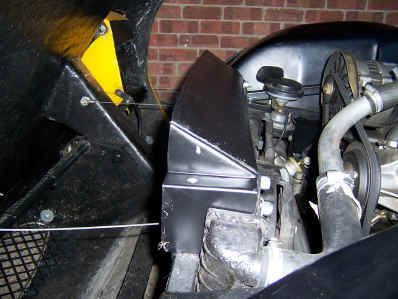
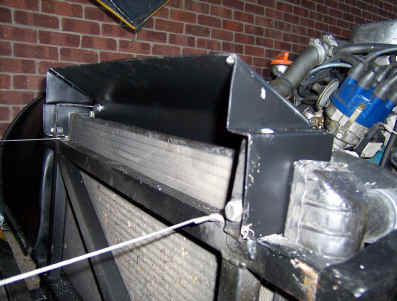
Cooling air passes over the top of the radiator.
Solution: Fabricate a scoop above the radiator to catch the air that would otherwise simply flow over the top of the rad. The leading edge needs to be curved to match the underside of the bonnet, but leave a few mm’s clearance to prevent stress cracks.
Cooling fans draw too much current for the relays and wiring loom. The wiring between the two fans via the bullet connectors also melts.
This whole area needs re-engineering, and to do a neat job requires the removal of the nose cone and radiator.
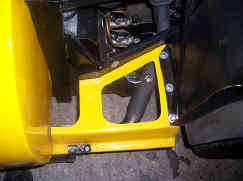
Remove all the burnt out wiring from the fan motors. Fit 2 x 30 amp relays (or 2 relays in one case) to the spare mounting hole at the top rear of the rad. Fit a two way fuse holder to the spare mounting hole at the base of the radiator. Wire each fan motor with at least 20 amp wire via the relay switching contacts, with one fuse per fan (25 amp each to allow for surge). Soldering is highly recommended over any sort of crimp connectors. Join the fan earths and the earth side of the relay coils and run a wire (at least 30 amp) down to a radiator mounting point. Clean all paint away to ensure a low resistance connection. The main supply’s for the fan needs to come from the 12volt output from the back of the alternator. Again use 30 amp wire, but split it into two to feed each fuse at the base of the rad’ before feeding it to the relay contacts.
Switching The Relays
One relay can be switched from the standard setup, by simply taking the old fan feed wiring into the one relay coil. This is somewhat overkill, as you end up with a relay under the dash, switching the fan relay, but it makes the wiring easy. It also maintains the "Fan on" indicator and override switch. BE WARNED. If the wiring has previously overheated, replace every bad connection. As the relay current is very small it may not "punch" its way through oxidised joints, and will fail to operate, even if the fan did...
The standard Ginetta / Cosworth sender comes on at 86 ‘ and goes off at 77’, but this is radiator temperature, not engine which is somewhat higher.
You can simply feed the second relay coil with the standard fan feed, but you end up with an all or nothing situation where both fans are slow in coming on, and then both stay on unit until the temperature drops. This constantly cycles the engine though a 85-95’ cycle that can’t be good for an aluminum engine.
A much better option is to switch the first fan from a separate system. I found the best bits are a Ford Escort 1.3 fan switch, with an aluminum adaptor fitted between the hose joints below the water pump. Details are:
Switch Intermotor 50010. Comes on at 79’ and goes off at 74’. It has a 3/8 bsp fitting. (about £7.00)
Hose adaptor Demon tweeks HA32BSP (about £20 )
You will have to visit a scrap yard to get the ford connector for the thermal switch. Its quite a common so you should find one on a Sierra / Fiesta or Escort.
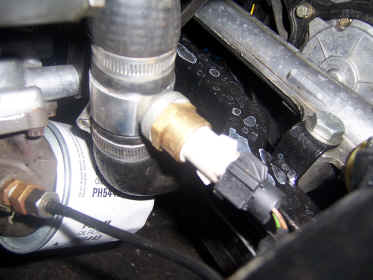
Wiring wise, I took a 12volt feed from the ignition coil to the thermal switch to switch the lower temp fan relay.
Results
Engine temperature so far is running at 80’ First fan comes on at around 80’ on the radiator output, and basically comes on once the airflow through the rad drops at low speed. The second fan then switches as it did before, but is switched on the input side of the radiator, so the engine temp has to rise before the fan comes on, regardless of air flow.
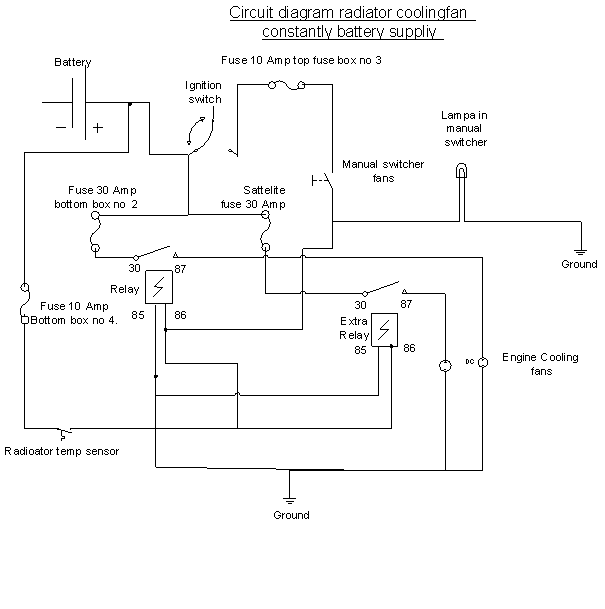
Thomas Anderson has sent this circuit diagram of his twin relay setup that uses the battery supply to hold on the fans after the ignition is switched off to help cool under the bonnet.
And Finally getting all that hot air out:
A couple of options I have tried. These side vents are cut out from a Mini Metro bonnet, and being steel, you can bend them carefully to fit the curvature of the bonnet.
You can also cut out the top of the sills where they project into the engine bay, but it does weaken the area a bit, and can cause the front wheel inner arches to judder a bit more over bumps. I have put extra braces in place, but they are welded to rails along the top of the engine bay not fitted to the standard G33.
Another owner has used Escort Cosworth bonnet vents on top of the bonnet.